

Blog
How to Trace a Fault in an EV High Voltage Battery
Authored by Gil Sher Associate Member Australian automotive engineer’s association.
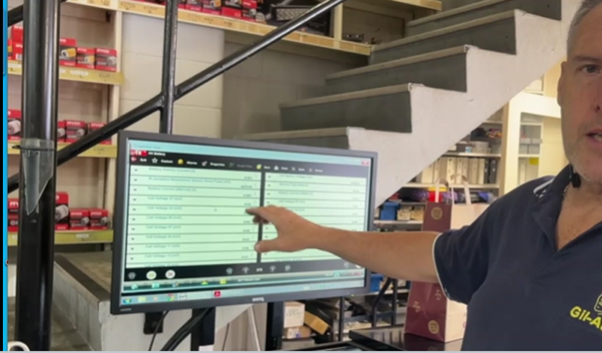
2017 Nissan Leaf towed in for a no start. Connect the computer, the errors we are seeing is P31E7 and P0AA6. Going to the workshop manual. Workshop manual gives us an IR sent short pulse, which is the isolation resistance PID. And we should be seeing a reading of 4,100 to 4,300 mV.
This insulation resistance PID that sits on the scan tool, shows us if we’ve got an isolation issue or a non-floating issue or leakage in the car system. So by looking at the live data, we’re seeing 4,479 mV. This is a known good car. So we know this is working, and it’s the way it should be.
When we looked on the original car, we had this PID as 782 mV – so way, way lower. So even from scan data, we could see that we had an issue.


Before working on the high voltage battery, the first thing we need to do is disconnect the 12v power supply.
Once you’ve done that, open up the isolation plug in the back of the car. Disconnect the isolation plug, and carry out the tests for isolation leakage at the 2 contacts in the isolation plug at the battery. Before we can do that though – we need to get underneath the car and disconnect the large orange cable, so we’re totally isolating the battery from the rest of the car.

Okay, we’re up to the stage where we want to check with the Mega tester. A Mega tester is a meter that can produce a high voltage of 1000 volts to a circuit, and then measures the resistance between the battery cells and earth. Ideally this should be an open circuit.
So we’re now applying 1,000 volts of voltage down these lines, to see what sort of resistance we come up with. So we’re going on the output side of the battery pack. So if we activate our test here. Hold it there for a couple of seconds, it goes open circuit. So we know we have total isolation on that particular terminal.
If we flick it over to the other terminal now, and we’ll try the other one. We’ll press test again. We’re applying those 1,000 volts. And, again – open circuit. So what we’ve proved now, is the isolation fault is not between these connectors here and the contacts inside the battery box.

Now we’re doing the insulation test from inside the vehicle here. We are now accessing the battery pack from above, where the service plug has been removed. The service plug is out. It’s technically divided the high voltage battery in half. And we’re going to check either side of that battery. We will test one half of the battery, and then the other half.

At this stage we have other electronic circuits in play between our contact point and the battery. We expect an open circuit; We need to be reading about 400meg ohms minimum but really want close to 4000meg ohms .690 mega ohms is the reading on 1 side of the battery circuit that is acceptable as the batteries are not completely isolated.
If we go over to the other terminal, the other half of the battery packs – and we press the test button again. In this particular case, we’re getting .002 mega ohms. We should basically be getting either a complete open circuit or a reading or one in excess of the 400 mega ohms… So there’s definitely high voltage leakage on this battery pack from this, testing it from this particular point.
This is definitive proof for us to remove and dismantle the battery pack to inspect for inspect the isolation leak
Battery removal is quite a simple process, but a lengthy time consuming process, in the whole scheme of things. Disconnect all the electrical cables. Support the battery from underneath the battery, and remove the bolts – and lower the battery down to access it, to work on it.


The top part of the lid is completely glued down to the bottom half of the lid and sealed to the bottom to make it water tight, being water tight it is also air tight. This design means heat dissipation is an issue when the vehicle is stationary on very hot roads. We have to cut through that seal. There is a lip inside that stops you penetrating too far and damaging the batteries. Even with the special tool shown below it can take up to 8 hours for one person.
The lid has to fit back on and be resealed so the lid needs to be removed carefully so it’s not bent or distorted.
The glue gets stuck on both the lid and the base and takes a long time to be removed and cleaned to be resealed properly


Once the lid is removed, we have access to all the components of the battery, including the battery monitor system, the main plugs, and all the individual batteries.
The image bottom left above shows the individual components of the battery. There are 5 main sections. 1. The large section at the back, and the 2 four sections on the sides. The connectors between those all need to be disconnected, so that we will be able test the individual batteries.
The bottom right image above is the first section is the battery contactor area. We were testing that part externally from below the vehicle when the battery was still installed. This isolates the battery, and turns the battery on when it needed so the power can flow from the battery, to the rest of the inverter converter system and electric motor
We removed the contactor from the circuit and also the battery management computer to be able to isolate each battery pack to test individually.
We’ve isolated the battery into 3 sections. We have battery pack 1, battery pack 2, and battery pack 3. We test them individually. We will go to do the Mega test, where we’re going to apply 1,000 volts across – from the battery to chassis. And we’re going to be looking at what the voltage and resistance is..
Testing the 2 front packs the similar looking battery packs at 1,000 volts we got approximately 4000 plus mega ohm’s which fantastic that’s what we want to see is. We’ve got really good isolation or resistance there from the battery to ground.
Testing the large battery pack at the back we’ve got a .002 mega ohm resistance. Very different and a much lower Ohm reading than expected The mega is sensing that there’s a bad leak to earth in conjunction the voltage reading is also much lower as there is and easier path for the electricity to travel. There is serious leak to earth. We move on now to investigate which individual battery of batteries is defective.
Below we have removed the battery pack outer casing.

We now check the voltage of each individual small battery pack.
Starting at the right-hand side, pack 1 & 2 measure 7.27 volts.
Number 3 only 7.22. All the rest tested at 7.27
Having isolated this battery from the rest of the pack we can now do the same isolation test as we were doing earlier. So we’re just on that particular cell. The mega is only getting to 17 volts, and we’re .004 mega ohms. This is our faulty battery with the leakage to the chassis
We tested the rest of the batteries in the pack with the faulty battery disconnected the rest of the pack was isolated showing 1015 volts and 4000mega ohms

Having removed the individual batteries, you can actually see the black stain on mini pack battery that has leaked out and caused the insulation failure.
This type of battery is called a pouch battery. They are filled with gel. The Gel has leaked out of the battery and is making contact with the chassis. We have traced our isolation leak to from the high voltage battery to the chassis of the vehicle.
This could potentially be a very dangerous situation. There is now a potential difference between the chassis of the car and the ground. If one was barefooted and touched a metal part of the car one could suffer a sever electric shock
The re-assembly will be dealt with in a separate blog which will follow.
RECENT POSTS & TIPS
- How to Trace a Fault in an EV High Voltage Battery
- Never Lose Your Car Keys Again
- Cross Section Of A Typical Water Themostat
- Testing of EV AC Electric Motor Phase Resistance Balance Test of The Windings
- Brake Fade
- Instructions for Jump Starting a Car
- Low-Pressure Exhaust Recirculation Filter (ERF)
- Reasons for front wheel bearings to breakdown
- Brake Cylinders Failure - Detection & Consequences
- Pollen Filters
- Will a DPF regeneration cure the blocked exhaust issue?
- Why should I change the oil filter each time I change the engine oil in my car?
- What Is AdBlue ?
- Origins of Suspension Systems for Modern Vehicles
- Parasitic Battery Drain
- ELECTRIC VEHICLES – A SIMPLE EXPLANATION
- GIL’S FORESIGHT, ELECTRIC VEHICLES WERE COMING
- MECHANICS OF VARIOUS BRAKE SYSTEMS
- SCAN TOOLS DO NOT FIX CARS. HIGHLY QUALIFIED MECHANICS DO.
- TOYOTA PRIUS HYBRID BATTERY REPAIR
